A good mailing list is essential to the success of an email marketing campaign. It doesn’t matter whether you have 10s or 1,000s of page views daily but if you have no way of persuading these visitors to return to your website in future, then all your efforts to increase sales may go to waste. It has been proven that repeat visitors usually end up being customers.
Mailing lists had been used even before the Internet exists when businesses started posting newsletters and promotional materials via snail mails. When Internet and email were introduced, this marketing method too went digital and businesses started sharing their promotions and updates through emails.
Another very important thing to remember when building mailing lists is that it should be permission-based. Don’t spam. Getting your customers to opt-in and agreeing to receive mailing lists is the ethical way and will improve your reputation while ensuring fewer bounced emails and un-subscriptions later.
Many businesses offer customers incentives or special deals to subscribe to their newsletters. It doesn’t need to be something expensive. A free e-book or a discount on the first purchase is sometimes good enough.
How do you create your Email Lists in Thunder Mailer
There are a couple of ways to create your list of recipients in Thunder Mailer.
Add the recipients individually
- Click on the “Recipients” button on the toolbar.
- In the Recipients Editor, click on the icon “Add Recipient to Recipient List”.
- A new row will be added in the Recipient List. Enter your new recipient’s details accordingly.
Generally, this option is used when you want to add a small number of recipients to an existing mailing list in Thunder Mailer or when the recipients are new sign-ups.
Import existing mailing list
Chances are that you may already have some recipients’ email addresses in your Gmail, Yahoo Mail, Outlook, Mac’s Mail and so on. You may also have a subscriber list on your popular blog, you can import from this as well.
Since the first option is pretty straight forward, we shall proceed to discuss on the second option i.e. importing mailing lists from another source.
We shall look at a step by step guide on how to import mailing lists from 3 popular email service providers i.e. Gmail, Yahoo Mail and Outlook.
We will discuss this in 2 parts, the first part is on how to export mailing lists from the email service provider and the second part will show how to import these mailing lists into Thunder Mailer.
Exporting contacts from Gmail
- Login to your Gmail account
- Open up your Contacts
- Click on More > Export
- Select all your contacts or specific contact groups that you want to export
- Select “Outlook CSV format (for importing into Outlook or another application)”
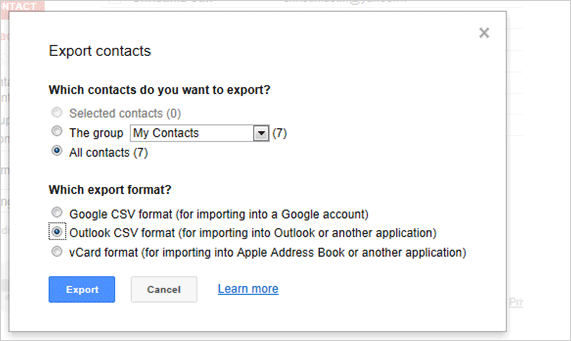
- Click Export
- You will be asked whether you want to open or save the contacts.csv file. Proceed to save the file into a designated folder so that you will be able to find it easily later.
Exporting contacts from Yahoo Mail
- Login to your Yahoo Mail
- Open up Contacts > Actions
- In the Actions drop down menu, choose “Export All”
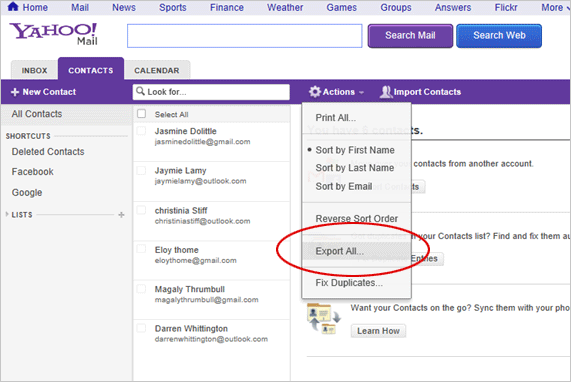
- You will then be asked to select the file type that you want your contacts to be saved in. Click on “Export Now” besides Yahoo! CSV
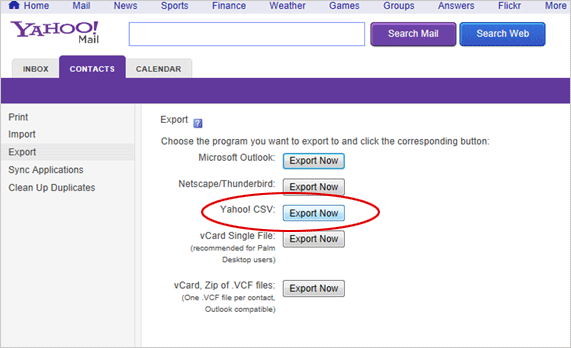
- Type in the verification code.
- Choose the location, rename your file name and select the “Microsoft Excel Comma Separated Values File” (.csv) file type
- Click Save
Exporting contacts from Outlook
- Login to your Outlook account
- Open your Contacts
- Go to Manage > Export
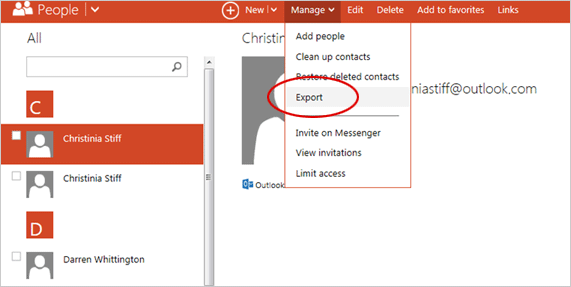
- Choose the location, rename your file name and select the “Microsoft Excel Comma Separated Values File” (.csv) file type
- Click Save
Importing .csv files into Thunder Mailer
The second part is importing these .csv files into Thunder Mailer’s Repository.
- Open Thunder Mailer
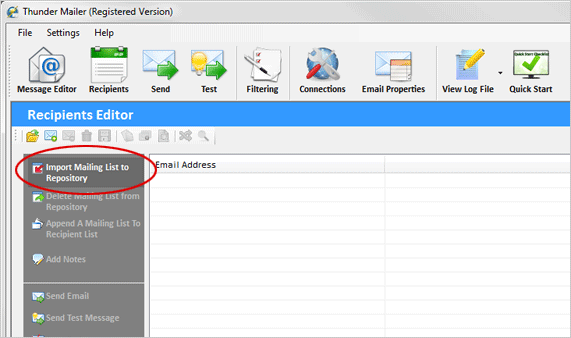
- Go to Recipients Editor > Import Mailing List to Repository
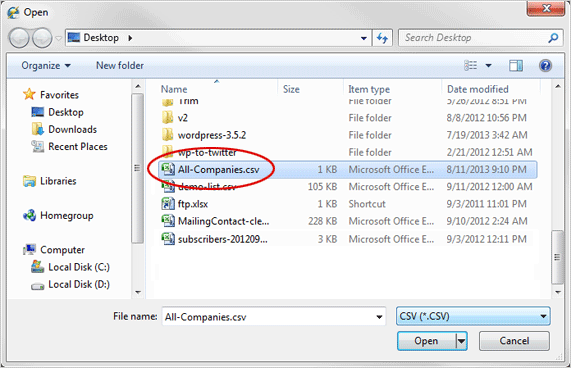
- Browse the folder where you have saved the mailing list files. Select the .csv file that you want to import into Thunder Mailer
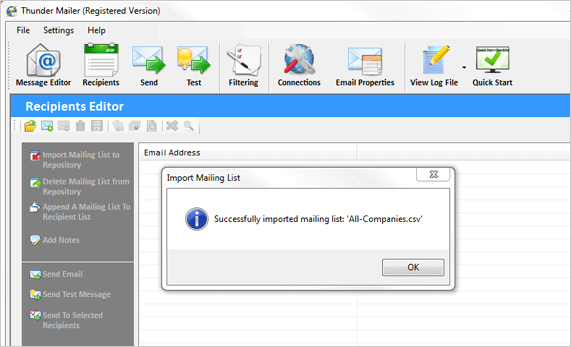
- You will then see a message indicating that the import of mailing list is successful
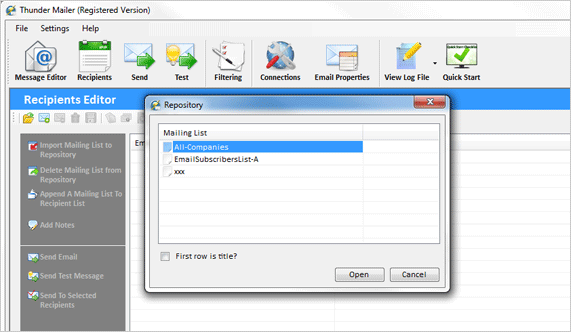
- You will then see a list of mailing lists in the repository, including the one you have just imported.
Tips: You can also go to Recipients Editor > Open Mailing List From Repository, to view/open the mailing lists which are in the repository.
- Select a mailing list. Click on Open to load it into the Recipients Editor.
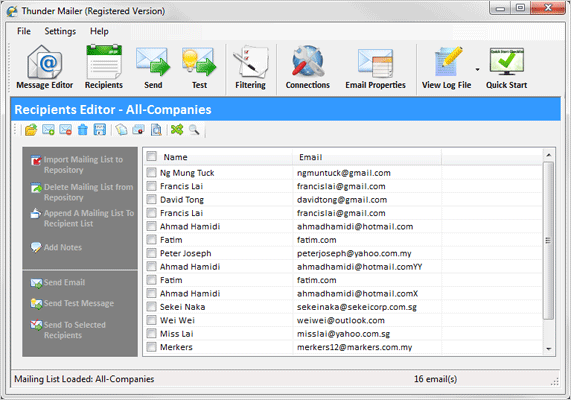
Tips: When opening a mailing list from the repository, tick “First row is title”, if in the mailing list, the first row consists of column titles. This will allow Thunder Mailer to name your columns accordingly in the Recipients Editor.
